| Thu
19 Jul 2007
A few days ago I
noticed a bend in the bottom rail on one side of the body, but with
no heavy, long, and straight piece of steel to use as a straight edge
I couldn't do much about it.
However Mick brought home a length of 75x25 last
night so I can look into the problem.
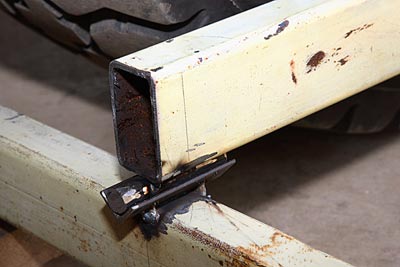
I clamp the steel along the rail and measure the
bend, over a distance of about two metres it has bowed in by 10mm.
That's huge, and it just happens to coincide with the body mount.

The 10mm bow in the bottom rail.
Either it's been there all along and I haven't
noticed, or all the heavy welding for the mount has pulled it in.
My money is on the second option because every time I walk past
the truck I cast my eye along it to check for square, and I'm sure
I would have noticed if it had been there for the last few weeks.
The first thing to remember when this happens
is DON'T PANIC. It can be fixed, the first thing to do is pull the
rail out to the straight edge with a clamp.

The gap seen from below.
That's a hell of a gap, often in these situation
you can just fill in the gap with the MIG, but at 10mm that's not
really an option.
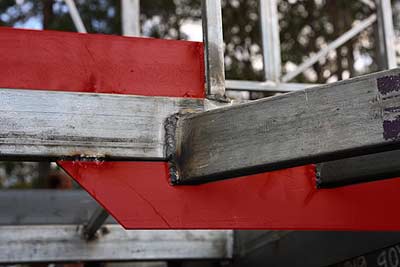
I cut about 6" from the two beams.

I cut the offending beams.
Why that much? Partly because it would not be
practical to weld a 10mm piece into the gap, and also because I
need to get the grinder in there to clean up.
I then cut some new pieces, clamp braces to them
every which way from Sunday, and weld them in.
With all the steel braces clamped here and there
it's a bit confusing, especially with the welding mask on, and it's
very tempting to weld anything that looks like it's in the right
place.
Note: Do not weld the bracing to the body, this
will only cause more work and frustration...I would think.
With that out of the way I move onto the body
mount on the other side. As it's the same as this side I figure
that it will also bow in as I do the welding. However it doesn't
move at all. Go figure.
While on a roll I decide to fix a smaller bow
I noticed a while ago. I generally fix these things by determining
the centre of the bow and the two locations where it starts, cutting
most of the way through the beam at these three places, clamping
the beam to a straight edge, and welding up the cuts.

Clamping the bowed beam to a straight
edge at the centre cut.
It's not rocket science but as usual there is
a trick, and that is to cut such that the cuts will tend to close
when you straighten the beam, not open.
In 'a' the cuts have been done in
such a way that they will open when the beam is straightened. By
cutting as in 'b' they will close.
Either way the gap should be small enough to fill
with a MIG so it doesn't really matter, it just seems the right
thing to do.
Sun 22 Jul
My continuous (aka piano) hinges arrived yesterday so I can fix
the poptop roof on properly. Because the hinge is stainless steel
I also use SS screws which I always find to be a pain.
TIP: When using SS screws drill a pilot hole
then tap a thread by screwing in a normal non-SS tech screw of
the same gauge. This will make it easier to screw in the SS screw.
And don't use a cordless drill for the SS screws, they are very
easy to snap. Use an old-fashioned screw driver of the manual
variety.
The other hinges are for the shutters and as they
will be under cover they are just mild steel.
Mon 23 Jul
For a couple of days I've been adding floor struts and more bracing
to the frame.
Some of the 75x6 bracing is welded underneath
the relevant frame beams, but the bracing that runs longitudinally
I've placed on top, partly because it's a lot easier to weld there,
and partly because it can do double duty as a kick board at the
bottom of the cupboards.
I thought that there was one place this couldn't
happen, and that was the entrance where obviously we don't want
to step over a 75mm brace every time we walk through.
But there is another place, one that I forgot.
When I come to add struts under where the air
conditioner will be located I realise that the A/C has to be placed
at floor level because it's under the pantry and there's only just
enough room. As the air conditioner's return vent is at floor level
it's right behind the brace. The brace has to go.

Cutting the piece of bracing
so it can be removed to allow the air conditioner to breath.
With all the floor supporting
struts in place I can lay the ply.

Two of the three floor boards.
This is 12mm ply that will form the base of the
floor. What we will use for a floor covering has yet to be decided,
but I want something to walk on before I break my neck trying to
balance on steel beams.
Tue 24 Jul
What with preparing photos for some recent orders, driving down
to the post office, and starting a home brew it's lunch time before
I get started.
I add the last of the under-body bracing and do
as much of the welding as I can. A lot of it will get done when
the body is off the truck because it will be a lot easier then,
however I want to do as much as possible before I lift the body.
Wed 25 Jul
Today has been largely
spent working out the locking mechanism for the storage bin doors.
In keeping with my wish for a total clean skin, all hinges, knobs,
bolts etc must be hidden, as much as possible anyway.
To this end the bolts that secure the bin doors
are mounted under the body and will protrude into the bin and then
into holes in the doors. The bolts themselves will be locked by
bars that are pushed in to lock and pulled out to unlock. Parts
of all this will be visible but not obvious unless you know what
you're looking for.
All this has taken a while to figure out, but
I think it's under control now.
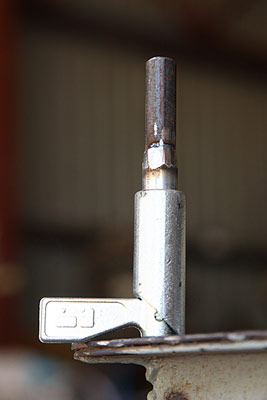
A bin door bolt, the standard shaft
part is not long enough so I've extended it.
My neighbours, the friends living in the house
part of the workshop, have moved out today. The electricity for
their house passed the final inspection so they can move in.
So I'm all alone :-(
Except I seem to have made a new friend. A little
bird has taken to approaching me for a snack while I'm having my
evening beer with my feet up. It lands on my boot and walks down
my leg until I either give it a piece of cracker or it can steal
a whole one.

Bird looking for a feed, sitting
on my leg.
I've never fed it before so don't know why it's
so tame, possibly it's used to getting fed at other houses and just
discovered me.
Thu 26 Jul
It's a big day today, Wothahellizat 2 is about to go for it's first
drive.
But first I have to make
some wheel bolts to hold the spare wheel on. What are wheel bolts?
Well that's what I call the bolts I've made by combining 7/8th UNF
bolts with wheel nuts from the truck.
Why not just use normal bolts? Because wheel nuts
have a bevel which mates with a corresponding bevel surrounding
the hole on the rim. This I believe is the reason wheel nuts don't
need spring washers to stop them from loosening.
Some time ago I bought four 7/8th bolts, so this
morning I cut off the shank and heads from the bolts, partially
screw them into some spare wheel nuts, and weld the lot together.
Thus creating my wheel bolts.

My four constructed wheel bolts.
Another job that I want
to finish before I take the truck on the road is the body bracing.
I've mentioned this before but feel some clarification is in order.
The main frame for the floor is made from 75x25x1.6
(3x1x1/16") RHS. In the 75mm direction this is pretty strong
but I still felt that something extra was required at strategic
locations. So I added some 75x6 (3x1/4") bracing.
In theory the best place to add this when spanning
between supports would be below the RHS beam, because this places
the brace in tension which is very strong. Placing it on top applies
compression and, like a piece of string, it's not as strong when
being pushed as when being pulled.
So ideally the brace should be on the bottom,
'a' in the diagram below.
However it's a heck of a lot easier to put it
on top and it can serve as a kick board there as well, 'b' in the
diagram.
The only trouble is that in two locations, the
entrance and next to the air conditioner, it can't be on top, so
I add a piece underneath the frame instead, 'c'.

Mouse over a, b, and c.
The bracing at the entrance location
(red bits). As you can see the top brace has to stop because of
the entrance, so I've added an equivalent underneath with some overlap.
In truth it's not as simple as that because the
tension/compression thing changes depending on where you are in
relation to the mounts, whether the frame is cantilevering etc.
If you were designing a space shuttle with really good analysis
tools and a requirement to shave every ounce then I guess you would
go further. But I think what I've done is enough, hopefully it will
be overly strong but not by too much.
With that done I'm happy to drive down to the
weighbridge. It's almost exactly eight years since I took Wothahellizat
1 on it's maiden voyage on the 27th of August 1999.

Wothahellizat 1 on it's maiden voyage
eight years ago.

And Wothahellizat 2 on it's maiden
voyage today. Check out how the paint has faded.
  
Some more photos of the truck while
it's out and about.
I'm aiming for about 7 tonnes,
however I use the word 'aiming' loosely because that implies I have
a method of hitting that target. Although I am very conscious of
weight in this version of the truck, short of anally recording every
single piece of steel, I don't have any real way of calculating
it.
I do know that I've bought about 700kgs of steel
as lengths and more in pieces for body mounts etc. I also know that
there's still a lot still lying on the floor. But I've added fuel
tanks and spare wheels as well. Anyway my guesstimate is 1 tonne
on top of the 6 the bare cab chassis was.
I drive down to the weighbridge at the local quarry
and put the front axle on the table. 4.46 the display says, that
sounds a bit much. Then I move the whole truck onto the table, 7.04,
that's great. At this point I would normally drive forward until
the front axle is off the table to get a rear axle reading, however
I can't see the display with the truck that far forward and would
have to get out of the cab. There are several quarry trucks in line
waiting and as it's their weighbridge, I'm allowed to use it for
free, and their time is money I drive off, figuring that I can calculate
the rear axle weight anyway.
When I get home I pull out the calculator and
discover that I've actually broken the laws of physics. Here are
the readings from today and when I weighed it a month or so ago
with no body, tanks, mounts etc.
|
front |
rear |
total |
before |
2.9 |
2.68 |
6.00 |
now |
4.46 |
2.58
(calculated) |
7.04 |
| |
|
|
Note
1: 2.9 + 2.68 <> 6.00, so the scales
aren't that accurate in the first place, although to
be fair I think they are designed to weigh something
centrally placed on the table and when you do a single
axle it's weight is right on the end.
Note 2:
7.04 - 4.46 = 2.58 which should be the weight on the
rear axles, but this is less than the previous weigh
in. |
|
So not only has the front axle gone up by 1.56
tonnes which I'm sure is way over the top, but the back axle weight
has reduced. Not a bad trick, presumably as I continue build it
will get lighter and lighter until it weighs nothing at all.
I'm sure the scale can't be that inaccurate, so
the only explanation I can think of is that, under the pressure
of the many trucks queuing behind me, I drove just a bit too far
onto the table when measuring the front axle, and actually weighed
one of the rear axles as well.
If that is the case maybe I can figure out the
weights. Let's make some assumptions.
Assumption 1: The 1-tonne increase
is valid.
Assumption 2: The increase
is spread 50:50 between the front and rear axles (this is a pretty
big assumption).
Therefore there are 500kgs extra on the front
and 500 on the rear. If I had placed one rear axle on the weighbridge
table that would have added 250kgs to the front's reading (the rear
bogie has load-sharing suspension so each axle takes exactly half
of the total rear load).
So I take 250kgs off today's front reading and
add 500 to the old rear reading and I get as follows.
front |
rear |
total |
4.21
(4.46 - 0.25) |
3.18
(2.68 + 0.5) |
7.04 |
|
It
still doesn't add up though, I think I'll go back
down on Saturday when hopefully they aren't as busy.
Fri 27 Jul
My ex-neighbours return today to do a final clean up and take the
dogs. The two big dogs they are welcome to, but I'm going to miss
my little mate Rex.

Reclining Rex.
Sat 28 Jul
Back down to the weighbridge. I've been quite deliberate about not
having the truck outside in the rain because there's a lot of unprimed
steel that I don't want to go rusty. This weighbridge however has
a wash down facility on the approach to the table, in the past it
has just washed the tyres but today it's decided that a full truck
wash is in order, and I get overhead sprinklers as well. Everything
gets drenched.
But at least there's nobody around and I can take
my time. I put the front axle on the table and pay particular attention
to the placement of the back axles. There is a ramp about 3 feet
long that leads onto the table proper, it's hinged on the table
and free floating on the ground. It's not that obvious, and if any
part of the middle axle was on that ramp the other day it would
have corrupted the reading.
Was that the case? The display says 3.72, last
time it said 4.46, so it looks like that was the problem. I roll
forwards and get 7.04, same as the other day. Still further forwards
until the front axle is off the table, 3.30.
Add the front and rear and you get 7.02, only
20kgs different from the total reading and well within specs I would
think. I'm sure most weighbridges are only good for about 20kgs
accuracy, after all, that's 0.1% of their normal load, a 20-tonne
truck.
So now it looks like we have a reading we can
trust.
front |
rear |
total |
3.72 |
3.30 |
7.04 |
|
I drive home a slightly longer way to dry the
frame out.
NOTE: Just as an aside, the ENTIRE current weight
of the truck is the same as we had on just the front axle a few
years ago.
While we're
talking about weights let's look at the distribution problems with
a truck like this, or indeed any truck.
Any weight added forward of the rear axle pivot
point (P in the drawing below) will add weight to the front axle.
Just how much depends on where the weight is placed, obviously the
closer to the front the more weight on the front.
As you can see, with a motorhome just about the
entire body is forward of that point, to make matters worse, in
our case the heavy parts of the body like the kitchen are at the
front. The rear is mostly lounge room which is almost entirely void
space. Having the bedroom over the cab doesn't help either, and
I believe this is an issue with all motorhomes that have Luton peaks.
So what to do?
Well we could redesign and put the lounge room
in the middle, but that's not what we want. So we have to try and
get all the heavy things towards the back.
Here's a drawing showing the major heavy items.
Motorbike: 100kgs: as this is
in the overhang it not only adds it's weight entirely to the rear
axle it actually lifts some off the front.
Batteries: 300kgs: same as the
motorbike. Note that as these items lift weight from the front,
and the truck's total mass stays the same, they must add weight
to the rear, it has to go somewhere.
Water: 600kgs: mostly on the
rear but some goes to the front because of the position of the body
mounts, say 30kgs on the front. Usually you wouldn't have so much
weight this high, but there is literally nowhere else to put it
under the chassis.
Recovery gear: 100kgs: snatch
blocks, jacks, chains, ground anchors etc. Entirely on the rear.
Fuel: 600kgs: about 60:40 rear/front,
but that's as far back as I could get the tanks.
Spare wheels: 200kgs: mostly
on the front, let's say 30:70, not much choice as this is where
they will fit.
Knowing this maybe I can estimate what affect
I will have by locating these objects where I have.
| |
on
rear |
on
front |
Motorbike |
120 |
-25 |
Batteries |
360 |
-60 |
Water |
550 |
30 |
Recovery |
100 |
0 |
Fuel |
360 |
240 |
Wheels |
60 |
140 |
Total |
1550 |
325 |
|
So it looks like 1.5 tonnes on the rear axle and
1/3rd of a tonne on the front, and most of that front load is in
the fuel and spare wheel. Unfortunately there is little I can do
about their location.
Now this figure doesn't mean much in itself because
there's so many other things to go into the motorhome and you shouldn't
underestimate the weight of all your "stuff". However
getting that much weight away from the front has got to be a good
thing, both to keep the truck legal and keep the steering as light
as possible (no power steering on this vehicle).
I mentioned the overhang above, and I know many
people have trouble determining just what you are allowed in Australia.
The short answer is, 60% of your wheelbase or 12-feet (probably
3.66m these days), whichever is the shorter.
So how do you measure your wheelbase?
For a two-axle truck it's just the distance between
the two axles, for a three-axle truck it's the distance between
the front axle and the centre of the rear axles.

Two examples of wheelbase (W) and
overhang (Wx0.6 or 12 feet) measurements. The red arrow indicates
the maximum body length for these examples.
Note that it's entirely plausible to have a larger
body on a smaller truck as shown in the above example.
Before you go too far with your design, especially
if you plan to extend or shorten the chassis, you should calculate
this. Also, don't take my word for it, ring your local road transport
authority, the rules change all the time.
Not that that will necessarily get you the right
answer. I phoned the RTA before I built Wothahellizat 1, on three
occasions I was told 60% and NOT ONCE did they mention the 12 feet.
I had built the entire frame when a friend from out of town dropped
in to see how I was going. "Gee that looks a bit long"
he said, "You're only allowed 12 feet".
We measured it at 11.5. Just dumb luck and that
was after doing the right thing and asking the authorities.
Sat 28 Jul
Still on the
subject of weighing the truck. Using the weighbridge is OK, but one
thing it can't do is tell me how the weight is going side to side.
In other words how well balanced is the truck?
I think I should build my own weighbridge, one
that can weigh each wheel separately. How hard can it be?
I have some bathroom scales, but they aren't rated
to several tonnes (if yours are then you can skip this section and
just drive over your scales), so I need to reduce the load of a
wheel in a proportional manner.
Enter the lever. If it's true that you can move
the earth with a large enough lever (and if that's not true then
Archimedes has a lot to answer for), then surely I can weigh a little
truck.
If I have a beam of length 10 supported at both
ends, and put a weight one tenth of the way along the beam (point
'b') I will get 1/10th of the weight manifesting at point 'c', and
9/10ths at point 'a'.
So far so good. But I've determined that I need
a factor of about 30x, with scales rated at 120kgs this will allow
me to weigh up to 3.6 tonnes (7900lbs).
Now in theory the absolute length of the beam
is irrelevant, it's just the ratios that count. So a 300mm beam
with the wheel placed 10mm in from one end would do the 30x trick,
but it might be a little difficult to work with. At the other end
of the scale how about a 30-metre beam, that would also work well
but be a handful for different reasons.
Another thing to think about is accuracy, the
longer the beam the more you can be out with your support and weight
points without compromising accuracy too much. Using the 300mm beam
example, if the weight is placed 11mm in from the end instead of
10 that's a 10% error, whereas that much misalignment is a non-event
with a longer beam.
I decide to use two beams, one set at a ratio
of 2:1 (to get 1/3rd of the weight), and another at 9:1 (to get
1/10th), thus totaling the 1/30th I need.

The concept in diagrammatical form,
with the bathroom scales on the extreme right.
I don't want to measure everything every time
I use it, so to make alignment easy I've welded some 16mm (5/8th)
round bar at most of the pivot points, and a piece of angle to cradle
the end of beam A exactly 1/10th of the way along beam B.

Now I just have to place supports and the scales
under the appropriate pieces of round bar, and the jack on the top
piece of round bar.
In this manner I know exactly where the forces
are being applied. If I just rested the beams on a blocks of wood
I would never know if the weight was being taken by one side of
the block, or the other, or some combination of the two. Similarly
with the jack, it's base is about 5" wide, if it was anything
but dead vertical the weight could be applied anywhere within that
5-inch area thus causing a huge difference in the reading.
So that's the theory, here's the practice.

Overall shot of the setup.
Note that I've put beam B at right angles to beam
A, no particular reason for this, it just seemed like a good idea
at the time.

Beam A and part of beam B.
Detail of beam A meeting beam
B. Round bar welded to beam A rests in some angle on beam B, this
self centres A at the correct location in one axis at least although
there is potential for error in the other axis.

The jack balances on a piece of round
bar so I know exactly where the force is being applied. As mentioned,
for this reason all the support points are on round bar (circled).
Note that the design pf the ACCO hubs makes this
arrangement particularly easy. On most vehicles you would have to
make a bracket of some kind for the jack, probably bolted to a wheel
nut or something.
Now let's give it a try.
I balance the jack in it's place but don't apply
any force to the wheel. This gives me the tare weight of the setup
and allows me to zero the scales.
Then I crank the jack up until the wheel has just
lifted from the ground and read the dial on the scales, 64kgs it
reads.
64x30=1920 or 1.92tonnes. That actually sounds
about right. I relocate the setup and repeat the process on the
other front wheel. 55kgs here or 1.65tonnes. It's lighter than the
driver's side, but we have the spare wheel on that side so that
sounds about right as well.
As the rear axles are load-sharing they should
have exactly the same load on each, so I just weight the middle
wheels and multiply by two.
The total for all axles is 7.29tonnes, that's
more than the weighbridge reading and I spend a while checking out
all my measurements.
I'm happy that I've done the right thing so decide
to do it all again, but this time weigh every wheel and be extra
careful.
I do get slightly different readings, and surprisingly
I find that the lefthand rear wheels have different weights (0.84
and 0.72), this shouldn't be possible and is something to ponder
some other time. The good news is that this brings the readings
more in line with the official weighbridge.
|
front |
middle |
rear |
totals |
right |
1.89 |
0.87 |
0.87 |
3.63 |
left |
1.71 |
0.84 |
0.72 |
3.27 |
|
|
1.71 |
1.59 |
|
totals |
3.60 |
3.30 |
6.90 |
official |
3.72 |
3.30 |
7.04 |
|
With a total of 6.9 tonnes I'm only 140kgs off
the official total reading, that's 2%, or put another way, 140kgs
divided by 30 (the ratio) divided by 6 (# of wheels) equals an error
of roughly 0.777777778 kg per reading. With a set of dodgy analogue
$19.95 bathroom scales I can live with that.
What I do know now is that the righthand side
is about 360kgs heavier than the lefthand side. No surprise really
as the spare wheels are mounted there, plus there's fuel in the
right tank. Hopefully I can even things up a bit as the project
progresses although that's not a huge amount.
There, that wasn't so hard was it?
Sun 29 Jul
I'm not a mechanical engineer but if you are and can see any flaws
in the above system please let me know. Meanwhile here are some
thoughts on my weighbridge.
The scales: There is friction
in the scales, just by jiggling them the dial settles in a different
spot thereby adjusting the reading by a kilo or so. Also there is
the potential of a parallax error when reading the dial. Using a
set of high quality digital scales would be better.
Jacking point: By lifting the
wheel from outside and not it's centre I am effectively using another
lever that will slightly reduce the reading.

This could be allowed for by incorporating the
ratio x:y if I was dead keen. Doing so would bring my reading closer
to the official weight.
Beam alignment: After doing all
this I rearranged the beams to be in line with each other as per
the drawings. I got very different readings and cannot figure out
why. There should be no difference.
Tue 31 Jul
Well my scales idea has brought a few readers out of the woodwork,
it's good to see you're paying attention. In general I've been told
I've done the right thing given the level of technology I have available.
I did notice one thing however while re-reading
the text this morning, a beam with a fulcrum at the 1/3rd position
does not have a ratio of 3:1, it's 2:1. It does produce 1/3rd of
the weight at one end so that doesn't affect the readings just the
drawings, so I've modified them.
As Chris arrived home from the UK this morning
and is trying to catch up on some sleep I need a quiet job to do,
so I've decided to work with the scales again.
Yesterday I couldn't figure out why I got such
vastly different readings with the beams aligned as opposed to being
at right angles. As I was getting pretty good results I let it drop,
but it's time to revisit that problem.
I try again with the beams in line. This time
I get good readings, in fact better than before which makes sense
because the way beam A rested on beam B in the right angle version
left itself open to an error being introduced.
Anyway, I think that's enough about weighing trucks
for the time being, now I have to think about what the next real
job will be.
|